Izy Hossack is a London based chef and baker, food stylist and food photographer, as well as author of the books Top with Cinnamon and The Savvy Cook. Izy has created two deliciously festive recipes for the Omlet Advent Calendar, you can find her Chocolate Gingerbread Bundt Cake here.
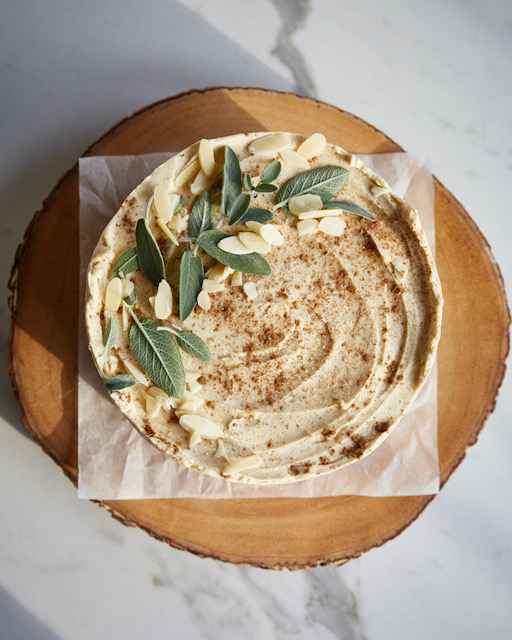
This layer cake is the perfect Christmassy bake to impress. Inspired by the flavors of eggnog, the cake and frosting are flavored with vanilla, nutmeg, cinnamon and rum for a slightly boozy, warmly spiced dessert.
The frosting is an interesting one to try – if you usually find standard buttercream too sweet, you’ll love this version (and it doesn’t require icing sugar!). The base is a cooked custard, thickened with corn flour and egg until very viscous. This is then whisked into softened butter until fluffy and creamy. It can seem a bit dense if the butter or custard are too cold so you may need to add a little bit of boiling water to help it fluff up properly. It’s definitely worth the extra effort over a standard buttercream as the texture is so smooth and light with the perfect level of sweetness.
For decoration, I like to keep the frosting simple with a thin layer around the outside and a slightly swoopy texture on top. For the toppings, I look for edible bits to give the cake a festive look; Woody herbs like rosemary, thyme or sage (as I’ve used here) are lovely as are chopped/flaked nuts. A sprinkle of cinnamon and nutmeg are a finishing touch and boost that eggnog flavor.
Ingredients:
Cake:
300g granulated sugar
140g unsalted butter, softened
60ml vegetable oil
4 medium eggs
150ml natural yogurt
150ml milk
1 tsp vanilla paste or extract
330g self-rising flour
1 tsp ground cinnamon
¼ tsp freshly grated nutmeg
¼ tsp fine table salt
¼ tsp baking soda
Frosting:
150ml milk
1 tsp vanilla paste or extract
80g granulated sugar
20g corn flour
1 egg
½ tsp ground cinnamon
¼ tsp freshly grated nutmeg
Pinch salt
200g unsalted butter, softened
2 tbsp dark rum
For the cake:
- Preheat the oven to 350 degrees Fahrenheit. Grease, line and flour three 18-cm cake tins.
- In a large bowl, cream the sugar and butter until pale and fluffy. Beat in the oil then eggs, one at a time.
- In a jug, combine the yoghurt, milk and vanilla.
- In a separate bowl, place the flour, cinnamon, nutmeg, salt and bicarbonate of soda and stir to combine.
- Add 1/3 of the yogurt mixture to the butter mixture and stir to combine. Add 1/3 of the flour mixture to the butter mixture and stir to combine. Repeat in this alternating fashion until you’ve mixed in all of the yoghurt and flour mixtures and have a smooth cake batter.
- Divide the batter evenly between the cake tins and bake for 25-30 minutes, until a skewer inserted into the center of the cakes comes out clean.
- Run a butter knife around the inside edges of the cake tins and then leave them to cool for 10 minutes before turning out onto a wire rack to cool completely.
For the frosting:
- Combine the milk and vanilla in a small pot and place over a medium-low heat on the stove until gently steaming.
- In a medium bowl, mix the sugar, corn flour, egg, cinnamon, nutmeg and salt until smooth.
- Pour a little of the hot milk into the egg mixture and quickly stir with a whisk until smooth. Stream in the remaining hot milk whilst stirring to combine. Pour the contents of the bowl back into the pot and return to the heat.
- Cook over a medium-low heat, stirring with a whisk, until the mixture becomes lumpy and thick. Keep stirring until it looks smooth and glossy, about 1 minute, then remove from the heat.
- Spread the mixture out in a shallow bowl and pop into the freezer for 5-10 minutes until cooled. Alternatively, chill the mixture in the fridge for around 1 hour.
- Beat the softened butter in a large bowl with an electric whisk (or in a stand mixer) until smooth then gradually add the cooled egg mixture, stopping to scrape down the sides and bottom of the bowl occasionally.
- Add the rum and keep whisking until the frosting looks aerated and light. If it seems too dense still, add 1-2 tbsp of boiling water to help soften the butter which should help the frosting to achieve the correct texture.
To assemble:
- Cut off any domed tops from the cooled cake layers using a serrated knife and peel away the baking paper from the bottoms.
- Place one cake layer onto a serving plate and spread a few heaped tablespoons of frosting over the top of the cake. Top with a second cake layer and repeat.
- When you’ve placed on the final cake layer, place ½ of the remaining frosting onto the cake and spread it thinly over the top and sides of the cake. Using a warm palette knife can be useful here (warm it up by placing into a jug of boiling water and wipe clean as needed).
- Place the cake into the fridge for 10 minutes to harden this initial layer of frosting.
- Remove the cake from the fridge and add the remaining frosting to the cake, using it to decoratively frost the top and sides as you like.
- Decorate the cake with any toppings you want – I’ve used grated nutmeg, ground cinnamon, sage leaves and flaked almonds here for a festive feel.
This entry was posted in Food
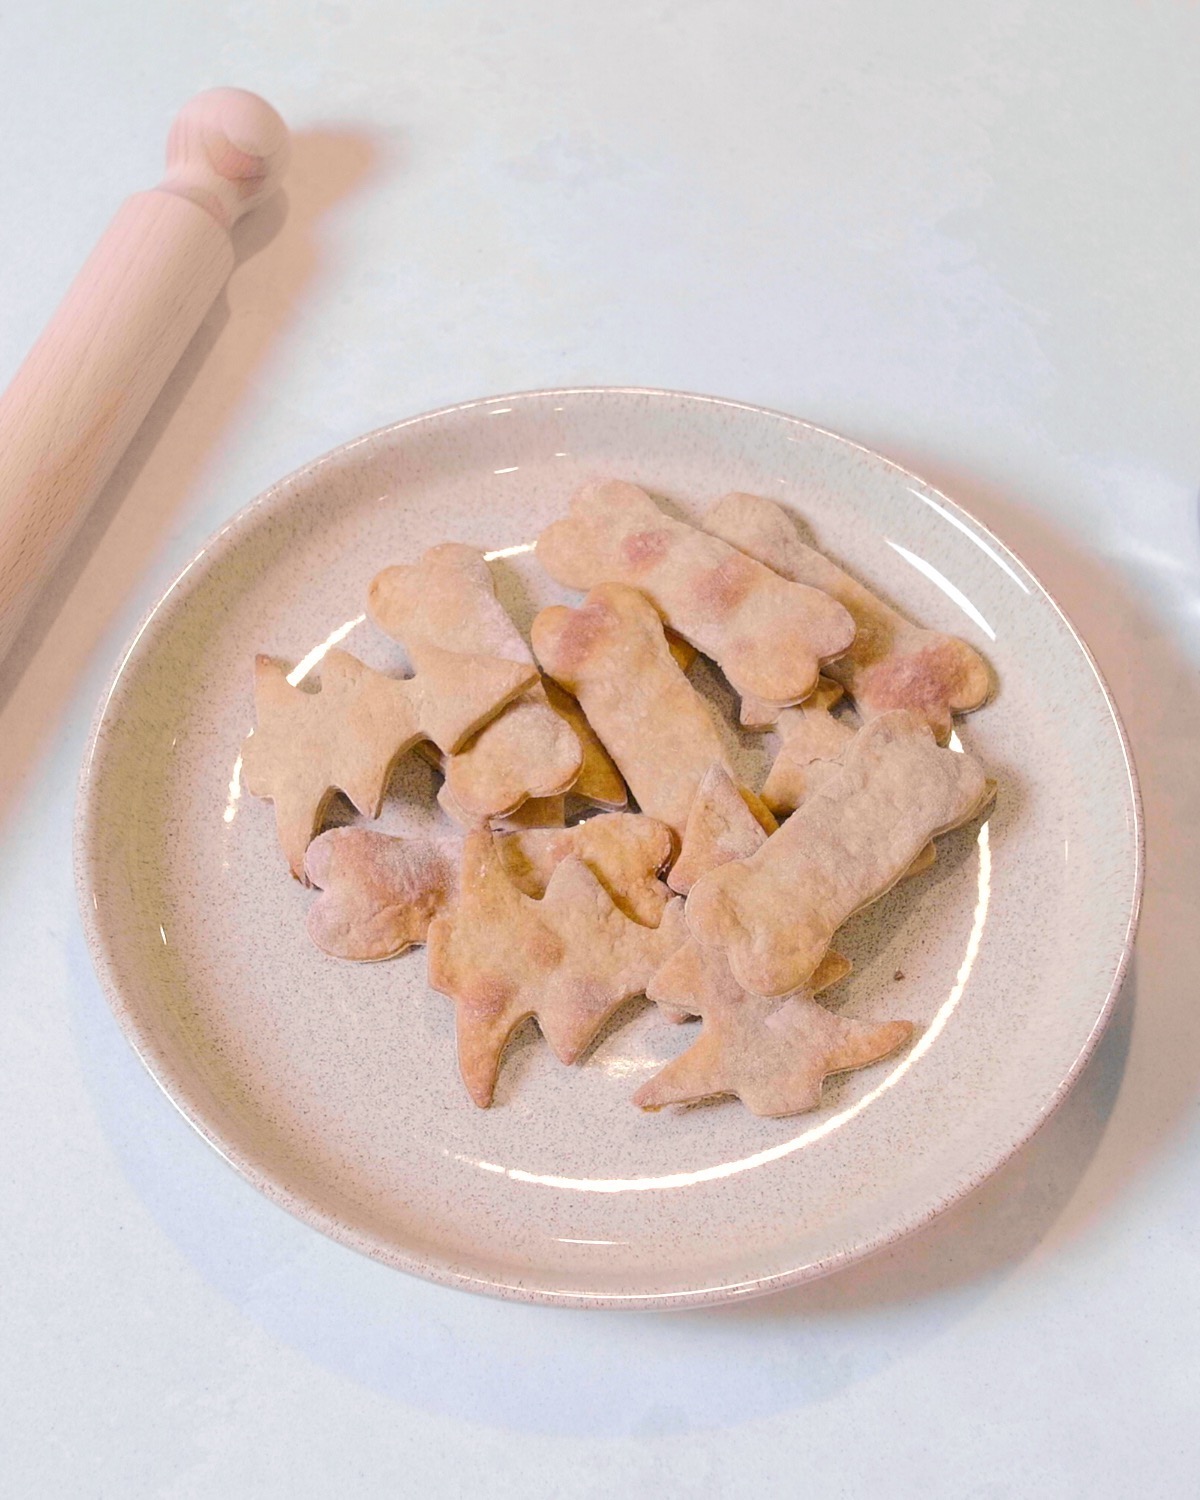
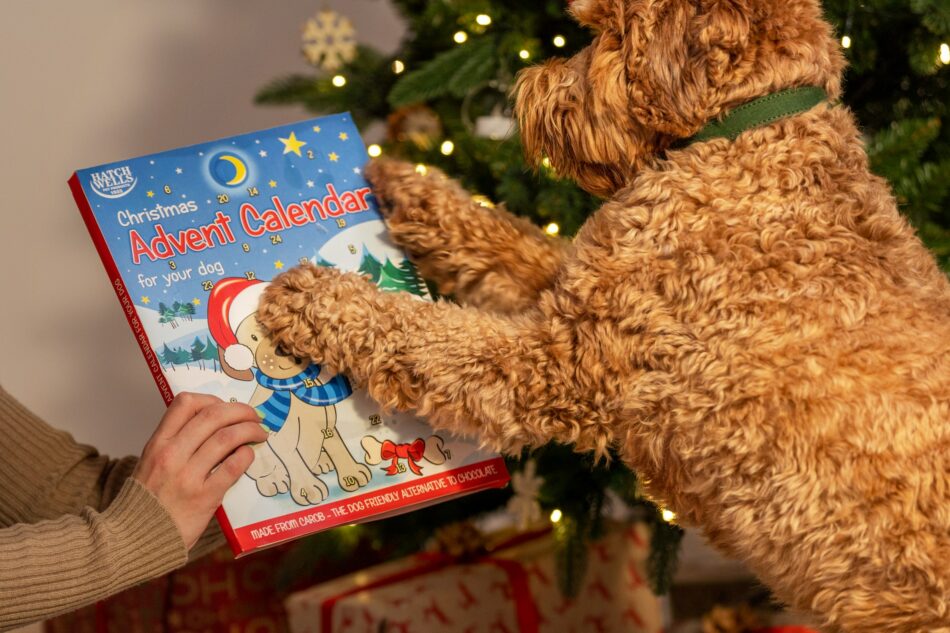
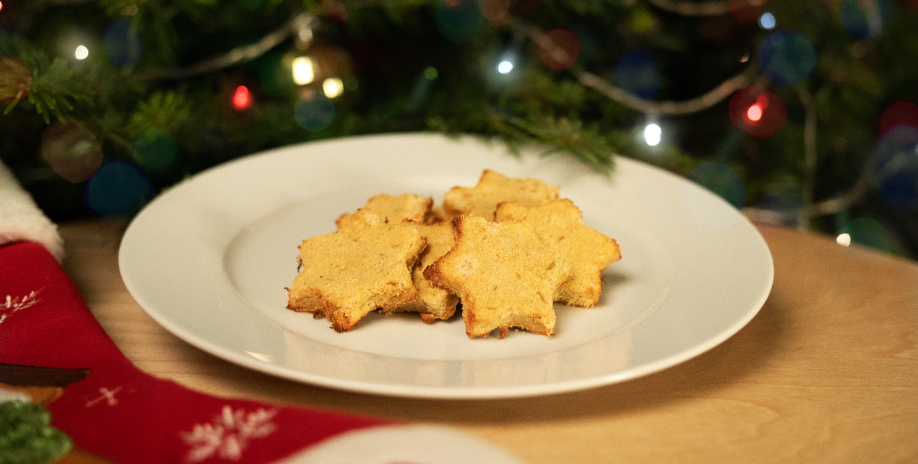
Everyone deserves a treat from Santa Paws this festive season, including our four-legged friends! This super simple recipe makes around 15 dog biscuits (using a 10cm cookie cutter), and are the perfect Christmas treat for your dog!
Ingredients
- 150g plain or whole meal flour
- 80g xylitol-free peanut butter*
- 1 banana
- 4 tablespoons hot water
- ½ teaspoon cinnamon
*Check the ingredients of your peanut butter – xylitol is toxic to dogs.
Method
Prep time: 10 minutes
Cook Time: 15 minutes
- Preheat your oven to 350°F. Mix together the xylitol-free peanut butter and hot water in a bowl.
- Add the banana to the bowl and mash with a fork until most lumps have gone.
- Add the flour and cinnamon to the bowl and use your hands to form a dough. The texture should be quite firm and sticky.
- Lightly flour your work surface and roll out the dough to about 1/4 inch thick.
- Cut out into your favorite Christmassy shapes and place on a lined baking tray.
- Bake at 350°F for around 15 minutes or until golden brown. Once cooked, leave to cool completely before your dog does the taste test!
Your homemade Christmas dog treats can be stored in an airtight container for up to 10 days. A friendly reminder that this recipe is intended as occasional treats for your dog, and should be fed in small amounts alongside a well-balanced diet. These treats are not suitable for dogs with nut allergies or other special dietary requirements.
This entry was posted in Dogs
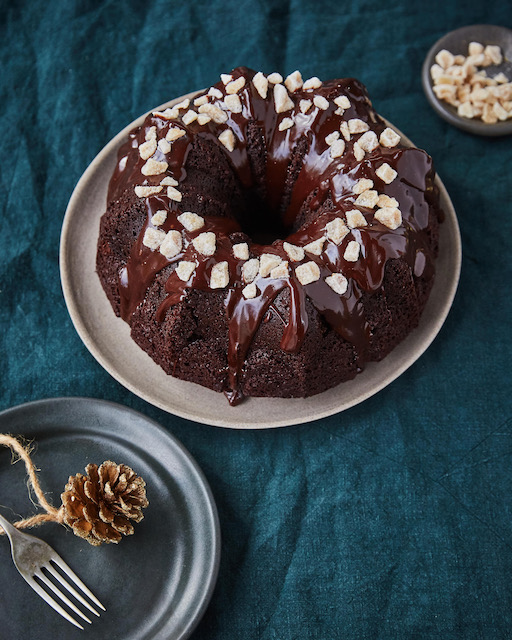
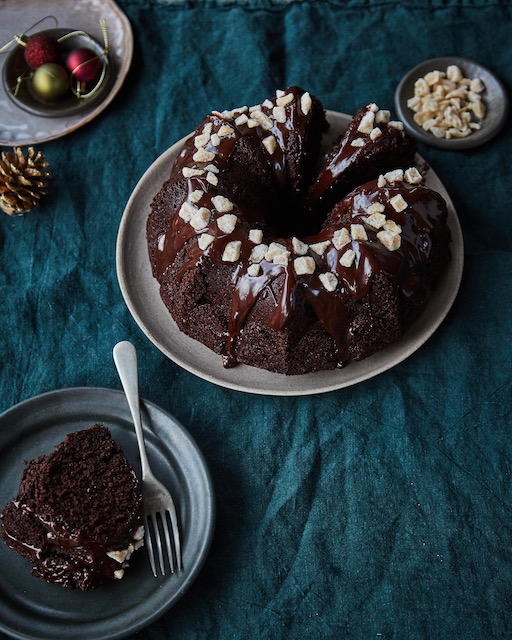
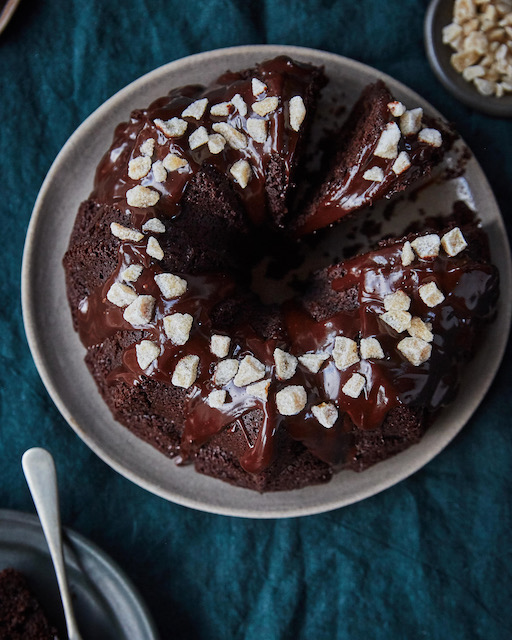
Izy Hossack is a London based chef and baker, food stylist and food photographer, as well as author of the books Top with Cinnamon and The Savvy Cook. Izy has created two deliciously festive recipes for the Omlet Advent Calendar, starting with this Chocolate Gingerbread Bundt Cake, perfect for the Christmas party!
Ginger and chocolate make the perfect combination in this festive Bundt cake. The batter is very easy to make as it’s a melt-and-mix situation, so no electric mixer is required! The golden syrup and treacle bring a soft, squidgy texture and boost the warming flavors of the spices. The ganache is best made with a bitter chocolate as this helps to tame the sweetness of the cake. For a pretty (and delicious) decoration, a simple sprinkle of crystallized ginger chunks is the perfect touch – you can find them in the baking aisle of most large supermarkets.
Ingredients:
175g unsalted butter, plus a couple of tablespoons for the tin
150g golden syrup
120g treacle
120g light brown sugar
3 medium eggs
200g natural yogurt
250g plain white flour
60g cocoa powder, plus more for the tin
1 ½ tsp bicarbonate of soda
1 ½ tsp ground ginger
1 tsp ground cinnamon
¼ tsp fine table salt
Ganache:
100g dark chocolate (70% cocoa content)
100ml double cream
3 tbsp crystallized ginger chunks
To prepare the tin:
- Place a standard Bundt tin into the freezer for 5-10 minutes. Melt a couple of tablespoons of butter in a medium pot (we’ll use this pot later for the batter too) over a low heat.
- Generously brush the inside of the Bundt tin with the melted butter, making sure you get into all of the crevices.
- Dust the tin with cocoa powder, tapping it around the tin to coat all over then tip out any excess (if you collect it on a plate, you can use the excess cocoa powder in the cake batter).
For the cake:
- Preheat the oven to 350 degrees Fahrenheit.
- Take the same pot you were using earlier and add the 175g of butter, the golden syrup, treacle and light brown sugar. Place over a low heat on the stove and cook, stirring often, until the butter has fully melted. Remove from the heat and allow to cool for a few minutes.
- To the cooled butter mixture, stir in the eggs one at a time, then stir in the yoghurt.
- In a large bowl, mix the flour, cocoa powder, bicarbonate of soda, ginger, cinnamon and salt.
- Pour the wet mixture into the dry mixture and stir with a whisk until smooth.
- Pour the batter into the prepared tin and bake for 40-50 minutes, until a toothpick inserted into the center of the cake comes out clean.
- Allow the cake to cool for 10 minutes in the tin before tipping out onto a cooling rack.
For the ganache:
- Place the chocolate into a small, heatproof bowl. Pour cream into a small pot and place over a medium-low heat. Once the cream is gently steaming, remove from the heat and pour over the chocolate in the bowl.
- Allow to sit for 10 minutes then stir to get a smooth ganache.
- Drizzle the ganache over the cake (which can still be warm when you do this) allowing it to drip down the sides. Decorate with crystallized ginger while the ganache is still warm.
This entry was posted in Food
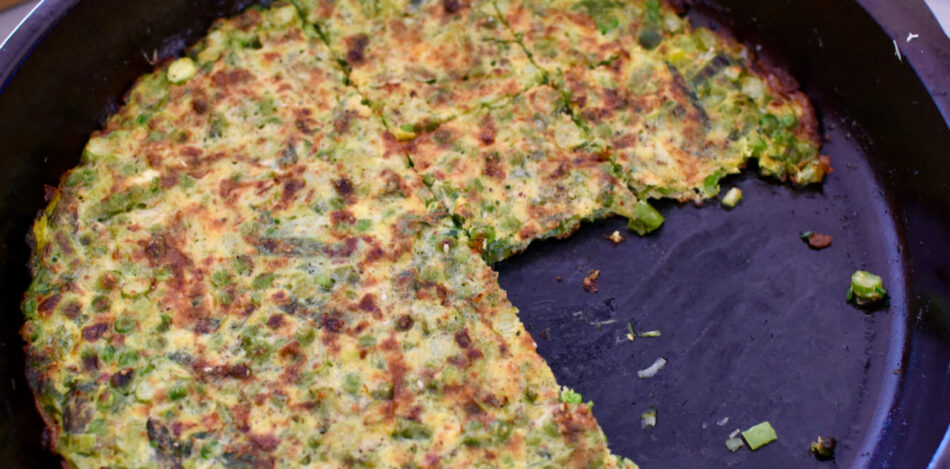
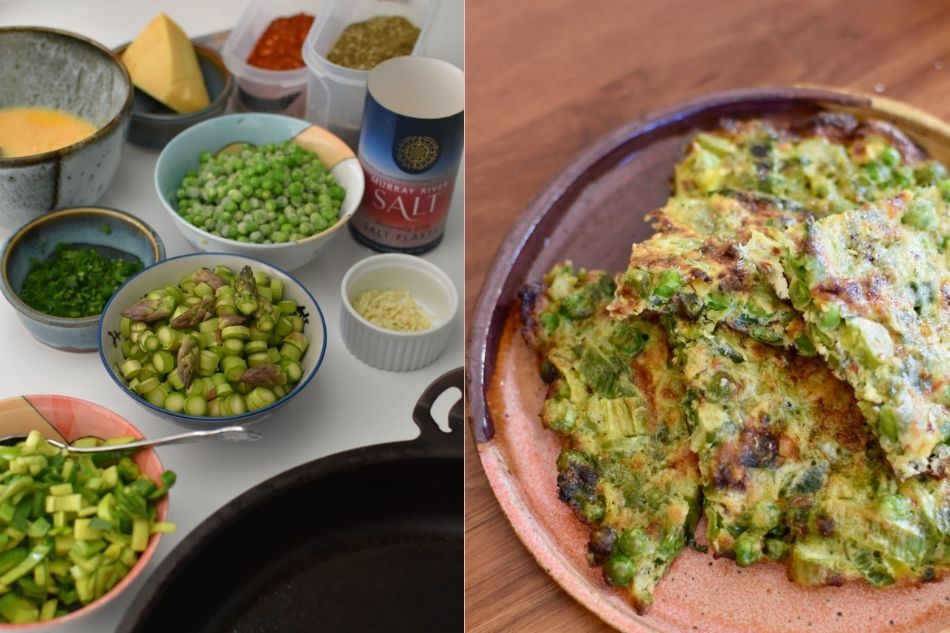
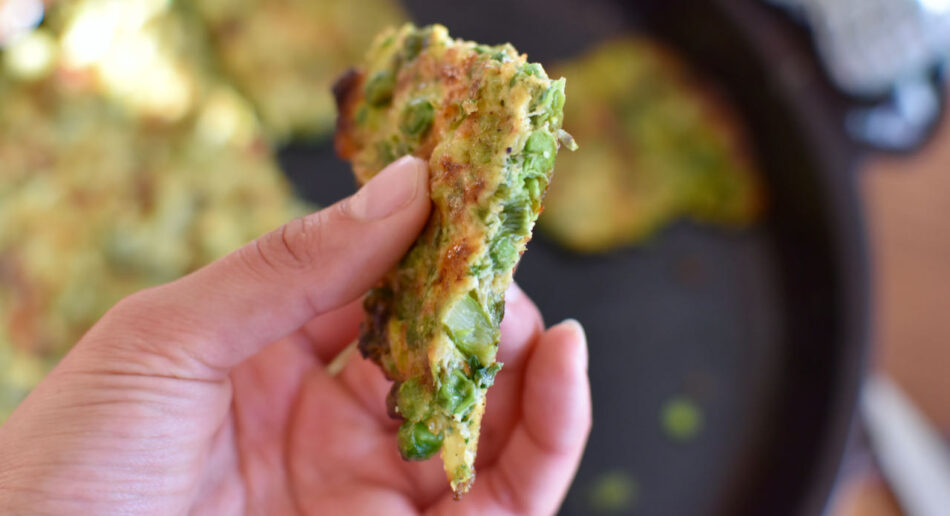
Elise Pulbrook is an Australian chef, baker, Australian Masterchef 2021 semi finalist and, as of recently, – chicken keeper! She’s sharing one of her favorite ways of using those lovely fresh eggs on the Omlet blog, a scrumptious asparagus, leek and pea frittata!
My favorite egg recipe of all time is my Zia Maria’s asparagus frittata. I’ve changed her recipe slightly, adding leek and peas. Sometimes Zia Maria adds chopped boiled potato. At the start of Spring, there has never been a shortage of asparagus in my family. Koo Wee Rup is Victoria’s asparagus country and my large Italian family has roots there. Zio Frank would bring at least one large polystyrene box of asparagus down to Melbourne every year for his sisters to divide amongst themselves.
This is a recipe I make as soon as sweet stems of asparagus come into season. To make this with my own chicken’s eggs is deeply satisfying! This is a thin frittata that is flourless and it is often referred to as an omelet within my family.
Ingredients:
- 200g chopped leek
- 200g chopped asparagus, woody ends removed
- 200g baby peas
- 10g chopped garlic, approximately 2 cloves
- 230g whisked egg, approximately 4 large eggs
- 30g fresh chopped parsley
- 2 -3 pinches of salt, or to taste (every salt is slightly different in its saltiness, know your salt!)
- 1 tsp chilli flakes, or to taste (some chilli flakes are hotter than others!)
- 1-2 pinches dried oregano or zaatar
- 40g grated pecorino cheese, or enough to cover the surface of your omelet
- Light olive oil for frying (at least 100ml, remember to be generous with your olive oil and cook like an Italian!)
Method:
1 – Heat a large well-seasoned cast iron pan or non stick fry pan. If using a 30cm fry pan, the quantities in the ingredient list will allow you to make two omelets. I have used a 35cm cast iron skillet for the frittata pictured. A rule of thumb for the success of many recipes is to choose the appropriate pan for the task at hand.
2 – Add 2-3 tablespoons of olive oil to your pan and begin to sweat your leek over a medium heat. Add two pinches of salt to help extract moisture from your leek and accelerate its cooking time. When your leek has softened and tastes sweet, add your garlic. Allow the garlic to soften and perfume the oil. Next, add your asparagus. Allow the asparagus to fry by slightly increasing the heat of your pan and allowing it to sizzle. Stir occasionally, avoiding any browning. We are aiming for a tender ‘just cooked’ asparagus with a slight crunch and bright sweetness. Add the peas and allow them to blister into radiant green jewels. The peas will only need a moment or two. If using frozen peas, you’re essentially just defrosting them in the pan. Taste the vegetables and, if they are all beautifully tender, remove them from the heat and into a large bowl.
3 – Mix the vegetables with the whisked egg, parsley, chilli flakes, a pinch of oregano and a pinch of salt.
4 – Wipe out your pan, bring to a medium-high heat and then add a generous 5mm layer of olive oil. Don’t allow your oil to smoke but do allow it to be hot enough for your frittata to sizzle once poured into the pan. Once you do pour your frittata mixture into the pan, flatten it out quickly using a spatula, pushing the mixture completely and evenly cover the surface area of your pan. Sprinkle over the grated cheese and the remainder of your oregano.
5 – Turn on the grill function of your oven to preheat while you are waiting for the edges of your frittata to start to brown. Check the bottom of your frittata by using a spatula to peek underneath. Once it has begun to brown, transfer the pan to the oven and leave to grill until the cheese on top has melted and begun to brown. Remove from the grill.
6 – Serve cut into squares as part of an antipasti selection or wedged between buttered sliced bread for lunch. Enjoy!
This entry was posted in Chickens
Some animals, such as rabbits and guinea pigs, are herbivores. Others, like hamsters, are omnivorous. Finally, there are also carnivores like cats that cannot survive without meat.
All animals need to have their nutritional needs satisfied. However, this does not mean you can’t have a vegan dog. Vegan cats, though, are a lot trickier.
Can my dog have a vegan diet?
 If you were to meet a species of animal for the first time and had to make an accurate guess about its diet, you would get lots of clues by looking at its teeth. The teeth of a dog, like the teeth of a bear, proclaim loud and clear that this animal is an omnivore – that is, one that eats both meat and vegetables. If you think of your dog as a domesticated wolf, you get a good idea of its natural diet.
However, as the panda proves, a supposed meat-eater can sometimes get by perfectly well on a vegan diet. A panda’s teeth are similar to any other bear’s – long canines for meat-eating and molars for grinding vegetation. And yet pandas don’t eat anything other than bamboo. So, if a bear can be vegan, does that mean you can have a vegan dog?
The answer is yes – but it’s a yes with lots of small print! A dog requires a diet that contains the fats and proteins it would get from meat. It is dangerous to ignore this basic need and simply feed your pet with whatever you please. Some dogs have delicate stomachs. Also, a low-fat/high-fibre diet can cause potentially life-threatening problems. A diet that excludes meat should never be fed to a dog without the advice of a professional pet dietician.
The collagen, elastin and keratin found in meat diets are not easily replaced by veggie equivalents. Your dog will also need the ‘long chain’ omega-3 fats found in animal products such as egg, fish and some meats. Vegan omega-3 fats are not the same as animal-derived ones.
All of which presents a headache for the vegan dog owner. There are, however, products available that claim to let your dog live a healthy, meat-free life. Before you take the plunge, it is essential to seek professional, scientific advice and guidance. Compromise is usually the best choice here – a vegan diet supplemented by some of the animal-derived essentials. Crickets, for example, can provide lots of the amino acids and keratin a vegan diet lacks, and they’re 65% protein.
Can my cat have a vegan diet?
The compromise approach is even more important for cats. These are amongst the planet’s true carnivores, obtaining all their dietary requirements from other animals.
The main challenge with minimizing the meat in a cat’s diet is that, unlike many mammals (including dogs), cats cannot produce certain proteins. They have to absorb these from the meat and fish in their diet. Amino acids are another issue – cats deficient in the animal-derived amino acid taurine, for example, usually succumb to a specific type of heart problem.
Even a fortified vegan cat food cannot be confidently recommended. Turn the situation on its head, and try to imagine weaning a rabbit onto a meat-only diet, and you will get some idea of the challenge – and the ethics – involved.
There are some lab-grown ‘meat’ products in development, with vegan and vegetarian cat owners in mind. However, whether these will arrive – and remain – on the market any time soon is hard to guess.
For many vegan pet owners, there is a huge ethical issue involved in feeding the animals they share a space with. Ethics, however, include the animal’s needs too, and it’s an almost impossible issue to resolve when it comes to cats. If you are able to reduce but not eliminate the meat in your cat’s diet, that’s the safer option.
Top 10 pets for vegan households
There are, of course, plenty of other pets that don’t eat meat, or that eat some meat but can still thrive on a meat-free diet. Here are our ten favorites.
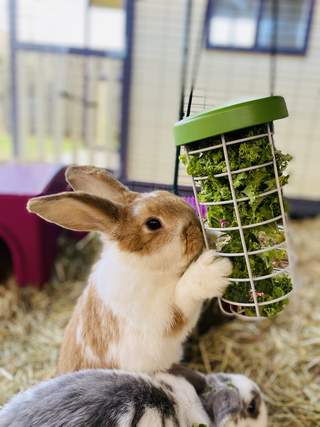 1. Rabbits. No problems here – rabbits are happy vegans, with diets based on hay and vegetables. You could argue that the soft pellets they eject and then eat are animal products of a sort, but they are simply semi-digested vegetation.
2. Guinea pigs. Like rabbits, these wonderful little characters thrive on a 100% vegan diet.
3. Hamsters. Most hamster owners give them store food, you don’t always know what’s in it. However, hamsters, like rats and mice, can do without meat.
4. Gerbils. Like hamsters, gerbils are omnivorous. They have sensitive stomachs and need a quality pellet mixture. Too much fresh produce can harm their digestive system.
5. Mice. Although they will eat pretty much anything in the wild, mice can thrive on vegan diets; but it is still best to use a food mix prepared specifically for them. This ensures that they will not be deficient in any of the vitamins and minerals they need.
6. Rats. These are the most omnivorous of rodents, but as long as you feed them a vegan mix that has been fortified with all the nutrients they need, they will thrive. Be careful, rats who eat too much animal fat tend to become fat and die prematurely.
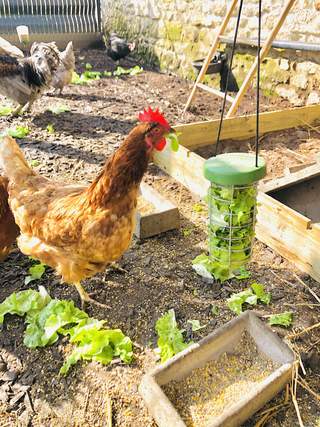
7. Chickens. If you watch a free-range hen, it soon becomes clear that she will eat anything – grass, beetles, worms, and everything in your vegetable patch if you’re not careful! Most chicken feed emulates this mix of plant and animal products. However, it is possible to buy vegan chicken feed, and circumstantial evidence suggests that hens can thrive on it. However, they are likely to produce fewer eggs, and you will not be able to stop them scratching for worms and bugs, no matter how vegan the layers pellets are!
8. Parakeets and parrots. Vegans will have no obstacles to face with budgies and parrots, unless the birds are being bred. Egg-brooding female birds need a protein boost, normally delivered via an egg-based food or cooked meat. Vegan alternatives are available, though.
9. Finches. Many finch species enjoy bugs and mealworms as treats, but these are not an essential part of an adult finch’s diet. These birds thrive on a mixture of seeds and fresh vegetables.
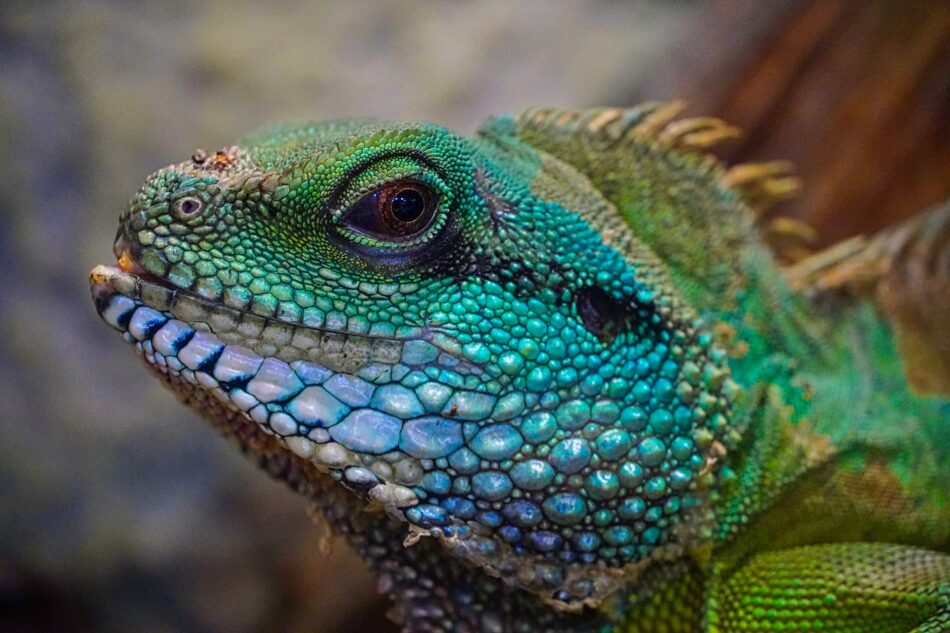
10. One for reptile fans. When you think of pet snakes and lizards, you probably have an image of dead mice or doomed crickets. However, there are a few commonly kept pet reptiles that eat a 100% vegan diet, the most popular being the Green iguana. Getting the balance of vegetables just right is very important for the animal’s health, but meat is certainly something you won’t have to worry about.
There is no shortage of choice when it comes to vegan pets. Keeping a vegan cat or dog is a much trickier proposition, though. And with all these animals, a balanced diet that matches the pet’s nutritional requirements should be your primary goal.
This entry was posted in Birds
They might be small, but the humble egg is a nutritional powerhouse. Plus, their versatility means they can be used to make thousands of delicious recipes we all know and love. But do you know fact from fiction when it comes to the amazing health benefits of eggs?
Busting the biggest myths
You’re probably not unfamiliar with hearing that eating eggs can cause high cholesterol and can lead to cardiovascular problems. But, the reality of this is actually very different.
While the yolk of a medium egg contains a high level of approximately 186mg cholesterol, the majority of cholesterol is made by the liver as opposed to through diet. Approximately 25% of the cholesterol in the food we eat is absorbed by the intestine and 75% of the cholesterol in the blood is produced by the liver.*
Rather, high cholesterol can be caused by genetics and lifestyle choices like smoking and lack of exercise. This isn’t to say diet is not a contributing factor towards high cholesterol, though. Rather, a diet high in saturated fats such as fried foods, processed meat, and full-fat dairy products should be more of a cause for concern.
Eggs are also not responsible for clogged arteries or cardiovascular problems. It’s actually how you cook your eggs, or what you eat with them that could play more of a role in heart health. Frequently frying your eggs in lashings of butter or serving them alongside fried bacon every morning is more the problem. But, as with anything, moderation is key and you should always consult your doctor for tailored medical advice.
Why eggs are so great
A great source of micro and macronutrients
Whether it’s the yolk or the white, eggs are full of nutrients and vitamins that are useful for your body to function properly. Eggs contain carotenoids, antioxidants that help to fight against age-related diseases, especially eyesight.
Plus, eggs are rich in protein (2 eggs are equivalent to 100g of meat), vitamins A, D, E, K, B2 and N12, as well as phosphorus, magnesium, potassium and minerals, all of which keep your body in perfect working order.
The vitamin B present in eggs helps your brain to function properly, i.e. memory and concentration. Eggs can be consumed during pregnancy, as the nutrients present in eggs, including vitamin B9, help the growth and proper development of the fetus.
Eggs also contain Zinc for hormone regulation and with the proteins and vitamins they provide, eggs are a real ally for your hair. There are many recipes on the internet for caring for your hair with eggs but our favorite is using one egg, a few drops of sweet almond oil (no more than 4) and a spoonful of honey – your hair will thank you! Leave on for 10 minutes and rinse thoroughly.
Low calorie
Did you know that an egg contains only 90 calories? Two eggs at 90 calories each and you can make a low-calorie but very tasty omelet. The appetite-suppressant effect of eggs also makes it a food to include in your meals if you want to feel fuller for longer.
Sweet treat or protein-packed lunch?
Aside from the various health benefits, eggs can be used in many different ways, allowing us to vary our meals. Whether you like eggs fried, boiled, scrambled, in quiche, in cake or in pancakes, there’s something for everyone.
You can find a cake recipe here or why not try out a delicious banana bread? And for the perfect pancake recipe click here.
How to choose your eggs
Nothing beats the taste of freshly laid eggs from your backyard hens. Plus, when your girls are as happy as can be in an Eglu Cube Chicken Coop, they taste even better! The love you put in towards caring for your flock really is returned with their labors of love in the form of tasty eggs. Having them on hand, without worrying about going shopping, is a real pleasure too.
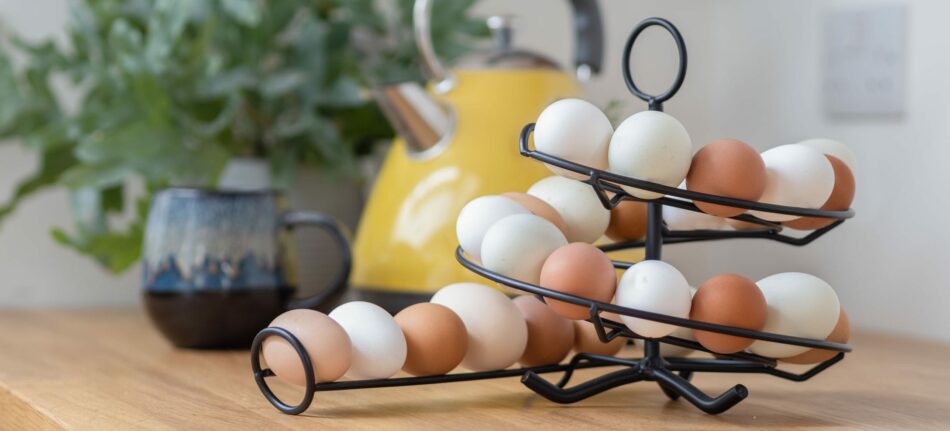
You can even show off your hens’ hard work in the Omlet Egg Skelter. Not only will the beautiful design stand out in your kitchen, but it keeps your eggs neatly arranged in order of laying to ensure that you always use the oldest eggs first, meaning no waste.
But, if you’re yet to experience the joys of chicken-keeping and are purchasing your eggs from the supermarket, here’s what to look out for. Please note that the nutrient content may vary slightly depending on the origin of the eggs you consume. The omega 3 content may be lower if you buy your eggs from a cage farm instead of organic.
AA-grade eggs – The egg whites are thick and firm. The yolk is high-raised and free from defects. The shell is clean and unbroken.
A grade eggs – Egg whites are less firm, yolk reasonably high, and the shell is free of cracks.
B grade eggs – Egg white is thin, the yolk is flatter, and is used in frozen or dried products.
Omlet and your eggs
Eggs have an array of benefits, and when chicken keeping is made so easy with Omlet, why miss out on the delight of having them fresh from your backyard? From our Eglu Cube Chicken Coop for super speedy cleaning, Autodoor to put your flock to bed and the Walk In Chicken Run to give your chooks space to roam, shop Omlet’s remarkable range of chicken products, designed in-house by expert chicken keeping, animal loving engineers.
*Cholesterol Overview: LDL, HDL, Triglycerides, What Cholesterol Levels Mean (webmd.com)
This entry was posted in Chickens
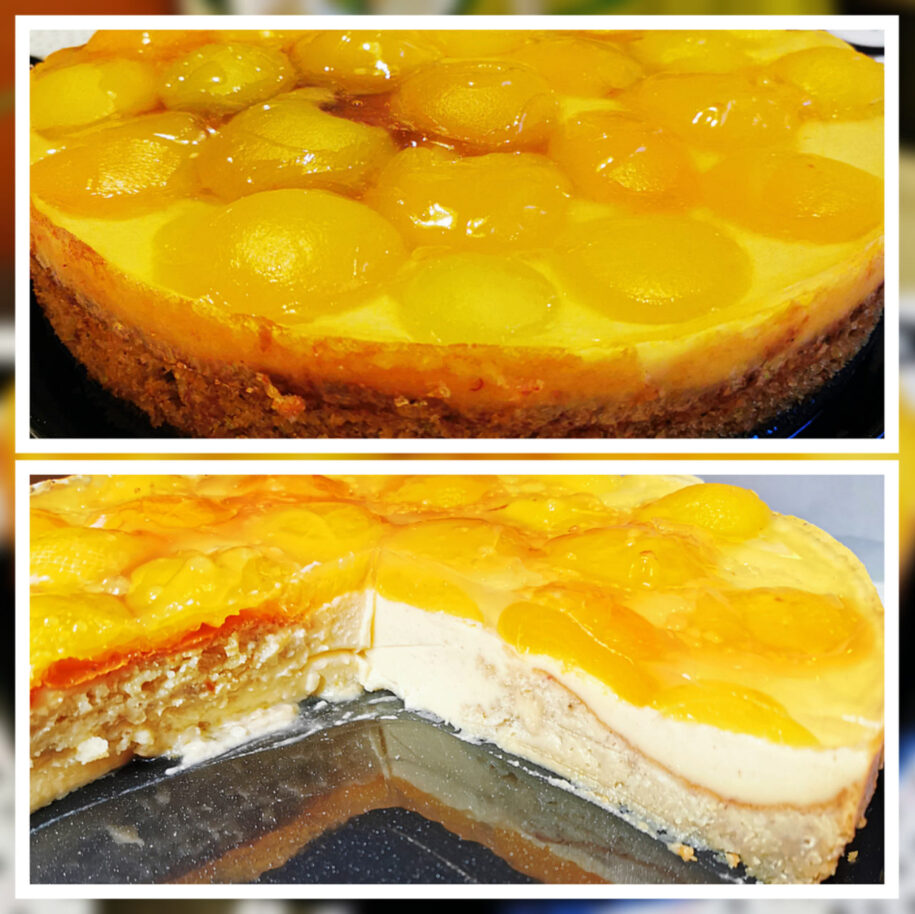
-The Best Things In Life Are Sweet-
The OMLET (Omelette) Cake
 Ingredients for the cake batter (for a 9 inch round cake tin):
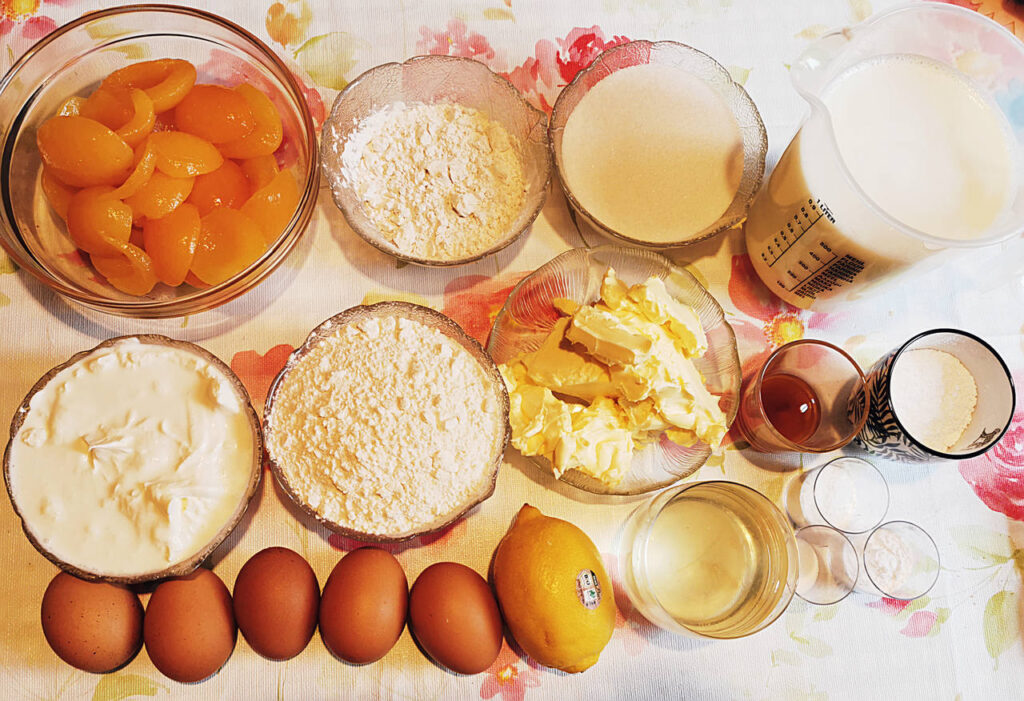
- 900 ml milk*
- 250 g sugar
- 250 g butter/margarine
- 4 tbsp lemon juice
- 5 eggs*
- 250 g flour
- 1 packet baking powder
- a pinch of salt
- 1 package of clear cake glaze*
- 1 can apricots halves (850 g drained net weight)
- 1 can apricots halves (425 g drained net weight)
Ingredients for pudding cream:
- 100 ml milk*
- 2 packets vanilla pudding powder
- 80 g sugar
- 1 packet vanilla sugar
- 2 cups sour cream*
*For a plant-based or vegan option:
As a milk substitute you can use any non-dairy milk (e.g. almond or oat milk). As 1 egg substitute use 1/2 mashed banana (5 eggs = 2.5 bananas) or 70 g apple puree (5 eggs = 350 g). You can buy vegan sour cream or soy yogurt. Instead of the clear cake glaze you can use agar-agar powder.
Instructions
- Grease a cake tin (9 in). Preheat oven to 340 degrees Fahrenheit (convection oven).
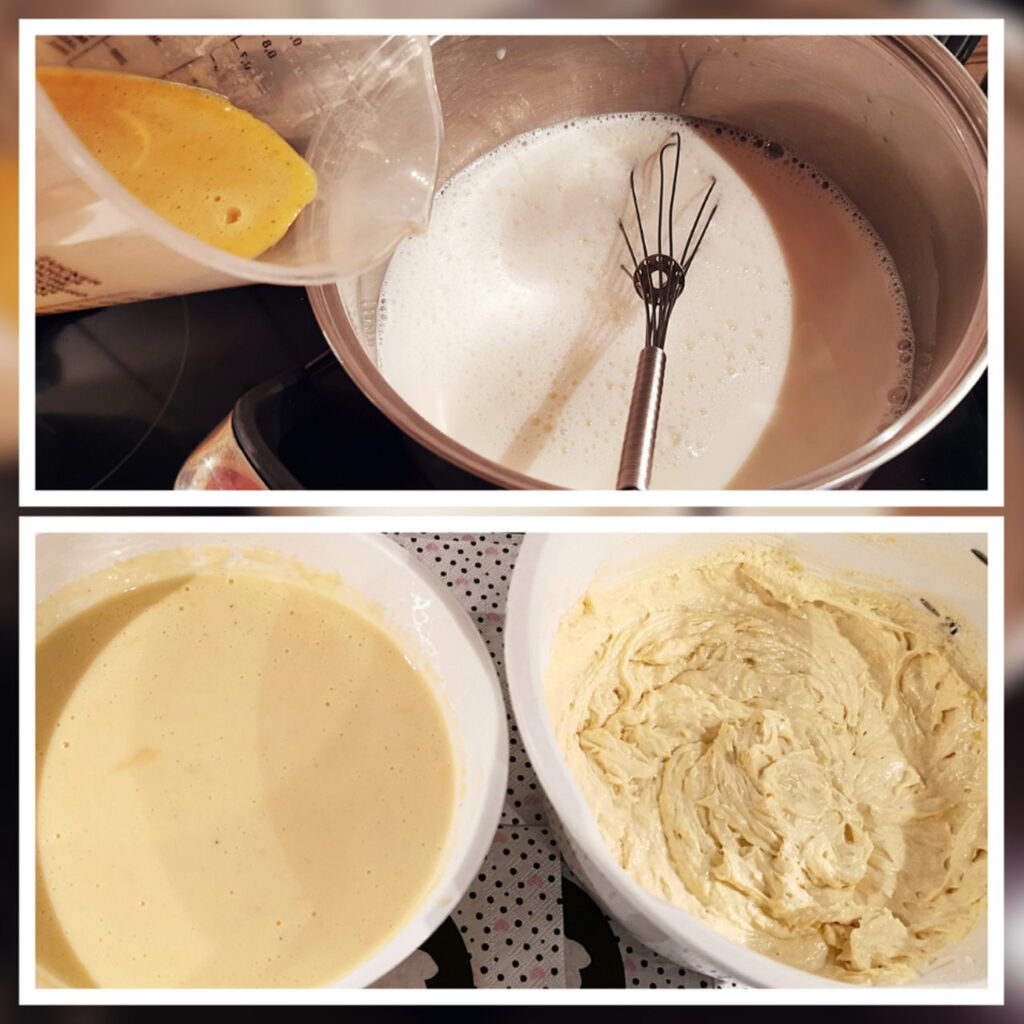
- Boil 900 ml milk in a saucepan. Mix in a bowl the remaining milk, 80 g sugar and vanilla pudding powder until smooth, stir into the boiling milk and cook well for 1 minute while stirring. Pour into a bowl and let cool, stirring several times.
- Mix butter/margarine, 200 g sugar, 1 pinch of salt with the mixer until you reach a creamy texture. Mix in eggs one at a time. Mix flour and baking powder and stir in 2 tsp of lemon juice. Put the batter in a greased cake tin and bake on the middle shelf for 20 minutes.
- In the meantime, drain the apricots well and collect the juice. Stir the pudding again, and now stir in the sour cream with a whisk. After the 20 minutes baking time, spread the pudding cream evenly on the batter. Cover the cake with apricots and bake for another 20-30 minutes. Let cool down.
- Mix the icing powder, remaining sugar, 1/4 liter of apricot juice and remaining 2 tsp of lemon juice in a saucepan and bring to the boil while stirring. Now spread the glaze with a tablespoon over the apricot halves so that it looks like egg white. Allow to become firm.

*You can use peaches instead of apricots as well.
If you want to bake the ultimate “Omlet”-cake with a 4 inch cake tin, use 1/2 of the ingredients and only one apricot halve on top of it.
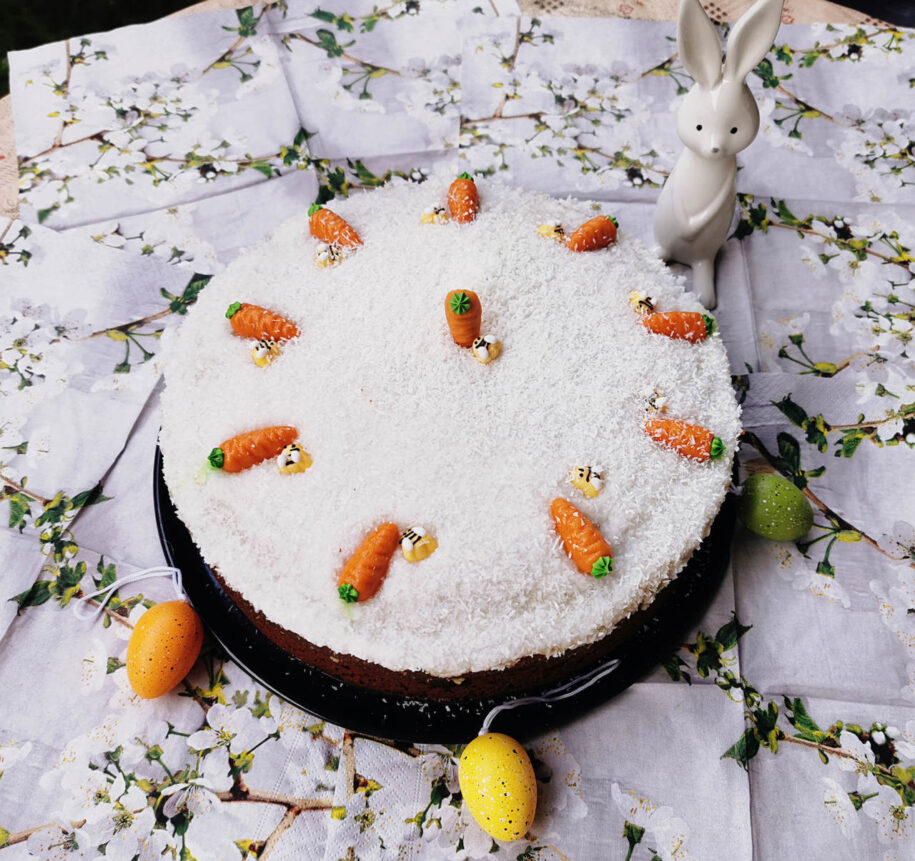
If you prefer a more traditional Easter cake, here is a super delicious yet easy recipe:
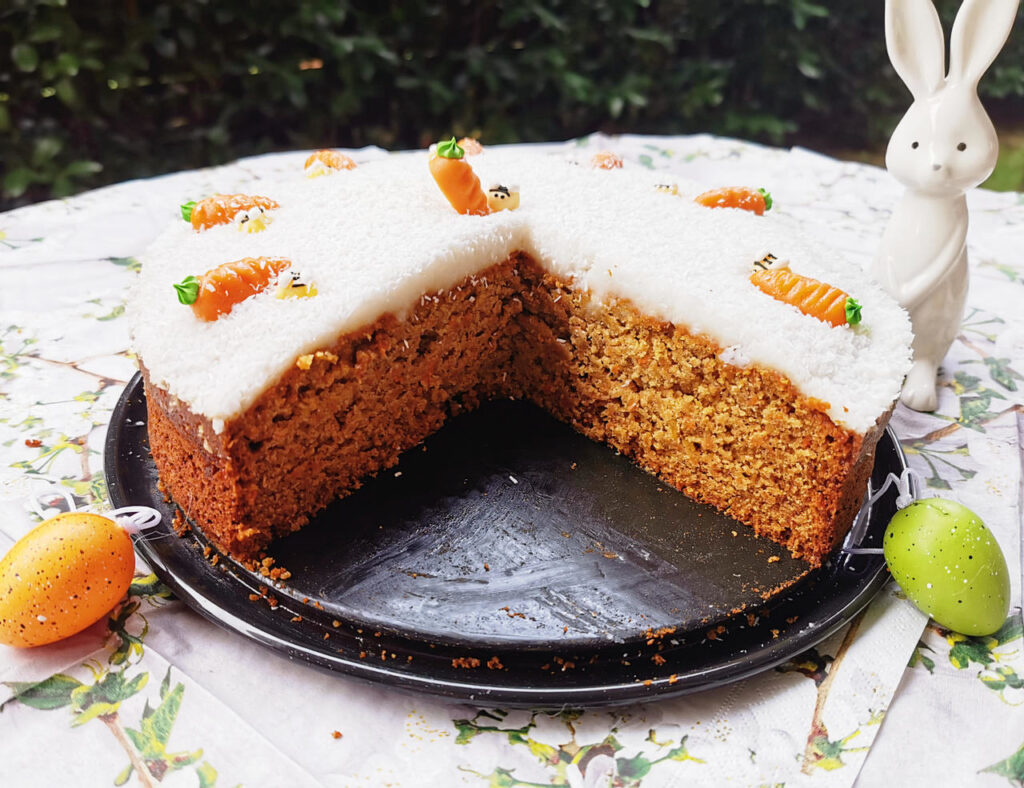
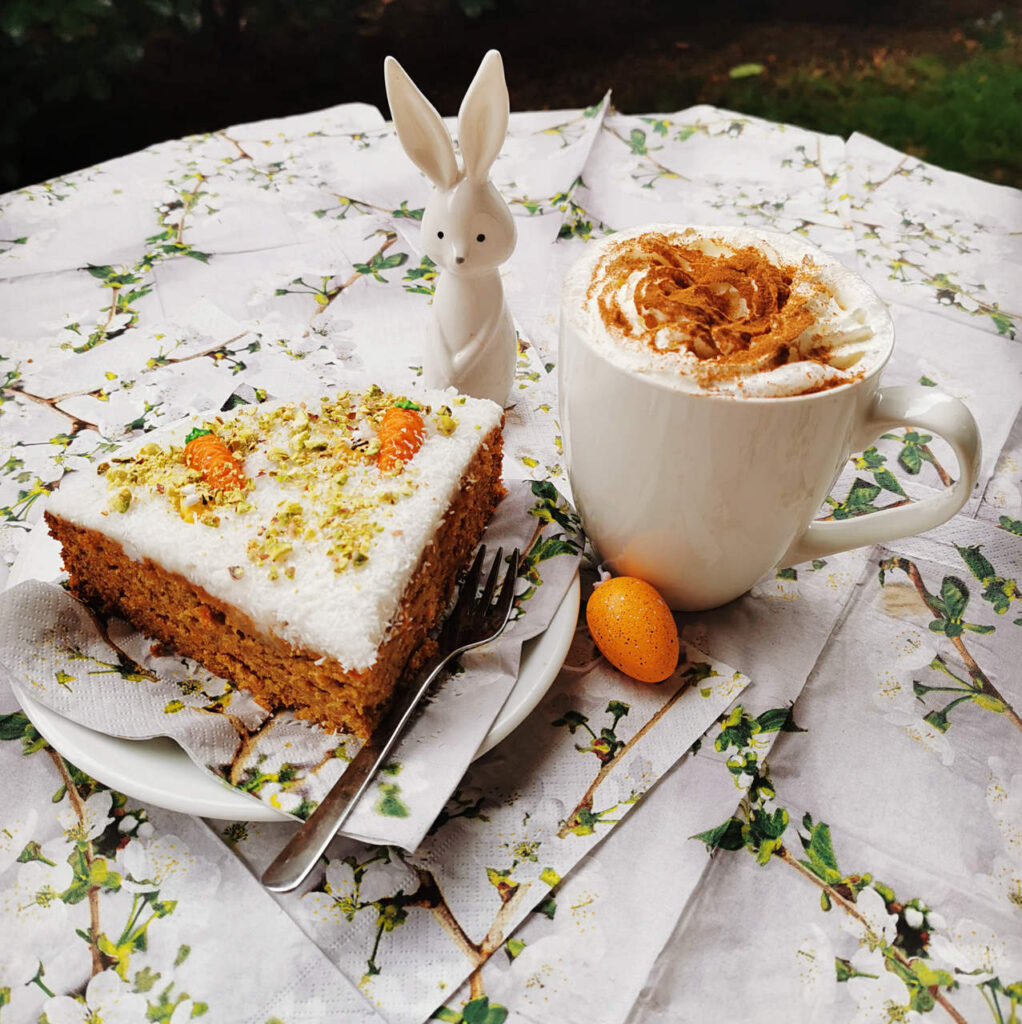
Carrot-Marzipan-Cake
Ingredients for the cake batter:
- 350 g wheat or spelt flour
- 4 eggs*
- 400 g carrots
- 100 g ground hazelnuts
- 100 g ground almonds
- 200 g sugar
- 1 packet vanilla sugar
- 1/4 tsp vanilla extract
- 1 vanilla pod
- 1 tsp cinnamon
- 1 packet baking powder
- 1 tsp baking soda
- 200g marzipan
- 200 ml rapeseed or sunflower oil
- 200 ml milk*
- juice of 1/2 lemon
- extra portion love
Frosting:
- 70 g icing sugar
- 200 g coconut yogurt
- 30 g coconut paste
- shot of lemon juice
optional: food coloring, e.g. green color
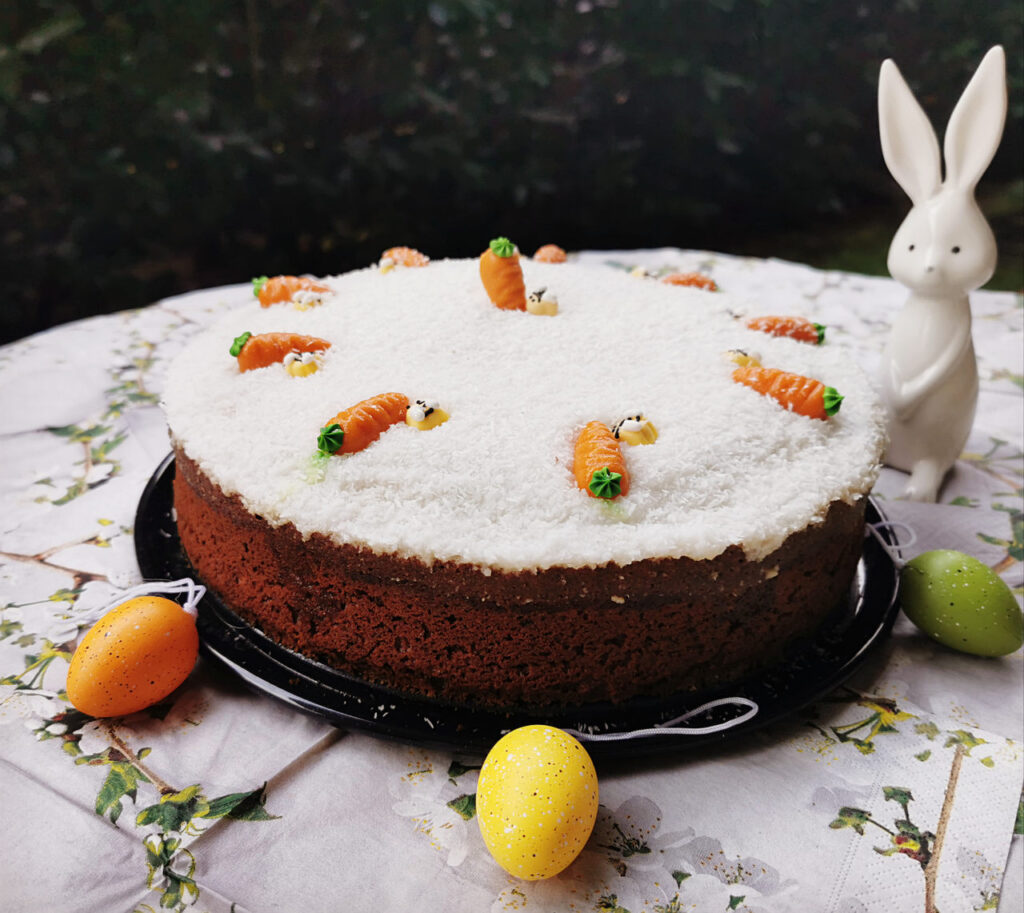
Decoration: e.g. Marzipan carrots, chopped pistachios, dried flowers, grated coconut
*For a plant-based or vegan option:
Use 2 tsp baking soda and 2 tsp cider vinegar or alternatively banana/apple puree as egg substitute (1/2 mashed banana per egg; 70 g apple puree per egg).
As a milk substitute you can use e.g. almond milk or oat milk, or any other non-dairy milk you prefer.
Instructions
1. Grease a cake tin (about 9 in) or use baking paper. Preheat oven to 350 degrees fahrenheit (convection oven).
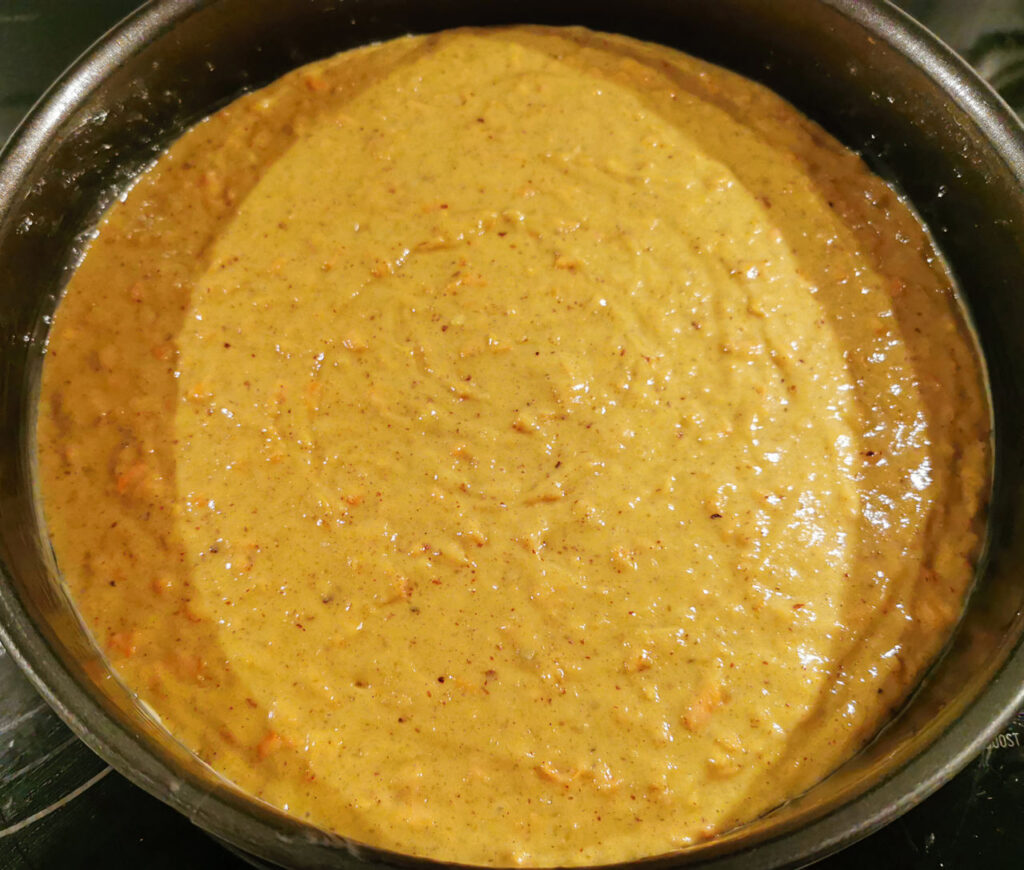
2. Mix dry ingredients (flour, hazelnuts/almonds, sugar, baking powder, baking soda, cinnamon) and the eggs in a bowl with a mixer. In a separate bowl, peel and grate carrots and mix them with the wet ingredients (vanilla extract, oil, milk, lemon juice).
3. Now slowly heat the marzipan in a saucepan, stirring repeatedly until it becomes a liquid mass. Mix the dry and wet ingredients together and gradually add the marzipan to the batter, mix well.
4. Pour the batter into the cake tin, smoothen it and bake it for about 50 minutes (use the tooth-pick test to make sure it is fully cooked).
5. Let the cake cool down and prepare the frosting in the meantime. Mix the sifted icing sugar with yogurt and coconut puree and season with more icing sugar and a shot of lemon juice. You can add food coloring to the frosting if you wish. Now spread the frosting on the cooled cake and decorate as desired, e.g. with marzipan carrots, chopped pistachios or dried flowers.
Enjoy!
Bon Appétit
&
Happy Easter from the Omlet Team!
Tag us on social media (Instagram: @omletusa) with an image of your cake!
This entry was posted in Food
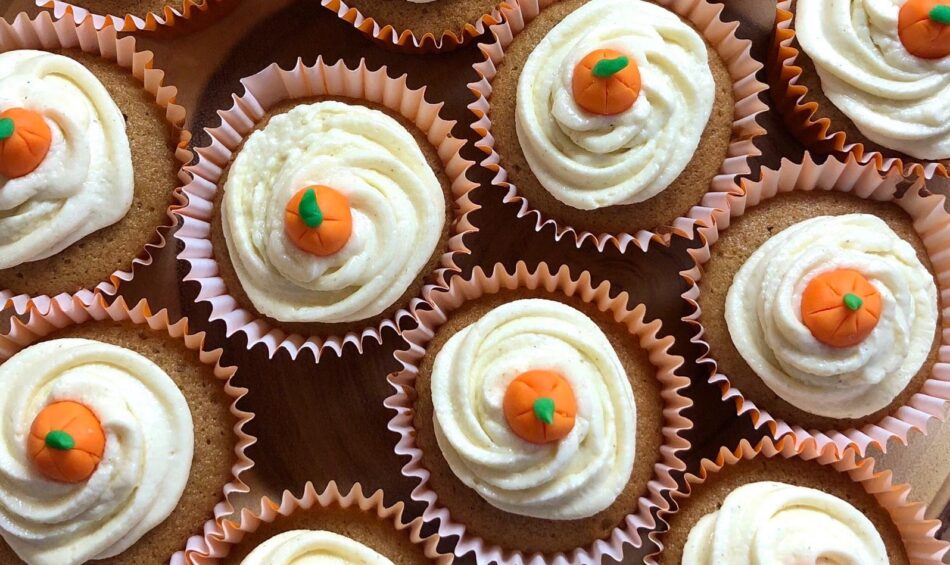
Not a fan of Pumpkin Spice? Fancy trying something simple, yet seasonal you can make with your girls’ eggs? Try out these delicious ginger cupcakes, with a nod to Fall on top!
To make 12 delicious ginger cupcakes, you will need…
- 12 cupcake liners (we have gone for orange to stay on theme!)
- 2/3 cup margarine or unsalted butter (softened)
- 2/3 cup light brown sugar
- 2/3 cup self raising flour
- 1 – 2 tsp ground ginger (to suit your taste)
- 2 large eggs
- 1 tbsp golden syrup
For the buttercream, you will need…
- 1 cup margarine of unsalted butter (softened)
- 2 cups icing sugar
- ½ – 1 tsp ground ginger (to your taste)
For the pumpkin decoration, you will need…
- Ready to roll fondant icing sugar-paste – orange
- Ready to roll fondant icing sugar-paste – green
- Preheat the oven to 350 degrees Fahrenheit, and line a muffin tin with 12 cupcake liners.
- To make your ginger cake mix, start by creaming together the butter and sugar in a mixing bowl. Sieve the self raising flour into the mixture with the ginger. We used 2 tsp of ground ginger but you can use less if you prefer a more subtle taste.
- Lightly whisk the eggs in a bowl and add them to the mixture. Mix everything together carefully.
- Once mixed add the golden syrup and give a final stir.
- Fill the 12 cupcake cases with the ginger cake mixture as evenly as possible.
- Place in the oven for 15 – 20 minutes.
- Leave to cool on a cooling rack before making the buttercream icing.
- For the buttercream icing, add a small amount of icing sugar to the butter at a time and cream together. Once smooth, add up to a tsp of ground ginger to the icing.
- Put the icing in a piping bag. We used a large, star shape nozzle for the piping. Start in the middle and circle around leaving some space at the edge of the cake. Then spiral up on top and pull away to leave a peak.
- Once you have iced all 12 cupcakes, you can decorate however you wish! We decided to make little pumpkins out of ready to roll icing. Simply roll the orange icing into small balls, no more than a cm in diameter. Then use a sharp knife to carefully draw lines down the pumpkin.
- Roll a small amount of green icing a long strip then cut into tiny pieces to create the stalks. Press the stalk down lightly onto the pumpkin, and place on top of your cakes.
This entry was posted in Food
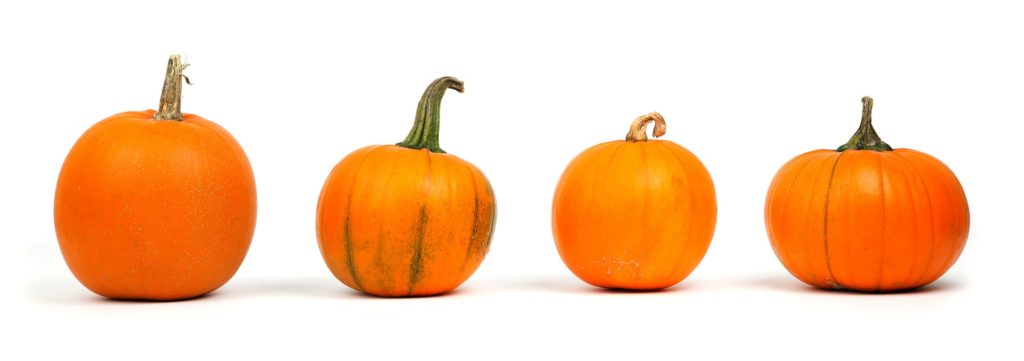
You might be aware that pumpkin is really good for us humans, but did you know that your pets will also benefit from having some on a regular basis? Most dogs love the taste of this autumnal squash, and it can help with everything from getting rid of nasty worms to making the coat super glossy.
It is important to mention that if you think that your dog is ill, you should take him or her to the vet before you try treating them at home. Pumpkin has amazing health benefits, but you will need to get your dog checked by a professional. If they’re all clear, here are some reasons to spoil your pup with some pumpkin:
DIGESTIVE HEALTH
Pumpkin is an amazing source of fiber, as well as essential vitamins and minerals that your dog’s health depend on. Fiber adds bulk to the dog’s stool, which slows down digestion. Canned pumpkin is therefore great as a natural diarrhea remedy.
You might find it a bit odd, but as well as helping when your dog has diarrhea, pumpkin can also be used for the exact opposite problem – to ease constipation. In this case the fiber in the pumpkin makes things in the intestines move along nicely, and the high water content helps lubricate the stool, making it easier to pass.
DEWORMER
Unlike pits and seeds from most fruits, which are normally a big no-no for all pets, raw pumpkin seeds do not contain cyanide, and can therefore be fed to your dog as a treat. Give them whole, or grind them up and mix with the dog’s normal food. Not only do most dogs love the nutty taste of the seeds, but they can also work as an effective natural deworming agent, and have the ability to eliminate intestinal parasites.
URINARY HEALTH
Apart from their deworming properties, pumpkin seeds also contain plenty of antioxidants and fatty acids that help promote a healthy urinary function. If your dog struggles from recurring and painful urinary tract infections, you can feed them pumpkin to ease symptoms and prevent future problems.
Aging dogs who struggle with incontinence, overactive bladder and kidney stones can also benefit from pumpkin seeds.
OTHER GENERAL HEALTH BENEFITS

Canned pumpkin is loaded with vitamin A, C, E, potassium and iron, which all have great range of health benefits. Among other things, vitamin A helps with vision, and vitamin C boosts the immune system. Additionally, vitamin C protects joints, which is especially important as dogs get older.
As if that wasn’t enough, the healthy fats in pumpkin seeds have inflammatory properties, and gives your pup a healthy, shiny coat.
While we see pumpkin as an autumnal treat, the fact is that you can feed your dog pumpkin all year around, as long as you get the right type. Buy plain, canned pumpkin (preferably organic), with no added salt, sugar or spices. If you want to give your dog pumpkin seeds, make sure you buy them unsalted. If they haven’t yet been roasted and shelled, it’s a good idea to do this before feeding them to your dog.
To start with, give your dog 1-4 tablespoons of pureed pumpkin, mixed in with their normal food. Most dogs will love the taste. If you want to you can slowly increase the amount over approximately two weeks, depending on the size of your dog. Don’t overdo it or increase the amount too quickly, as changes in food can lead to an upset stomach, and that’s the last thing you want.
This entry was posted in Dogs
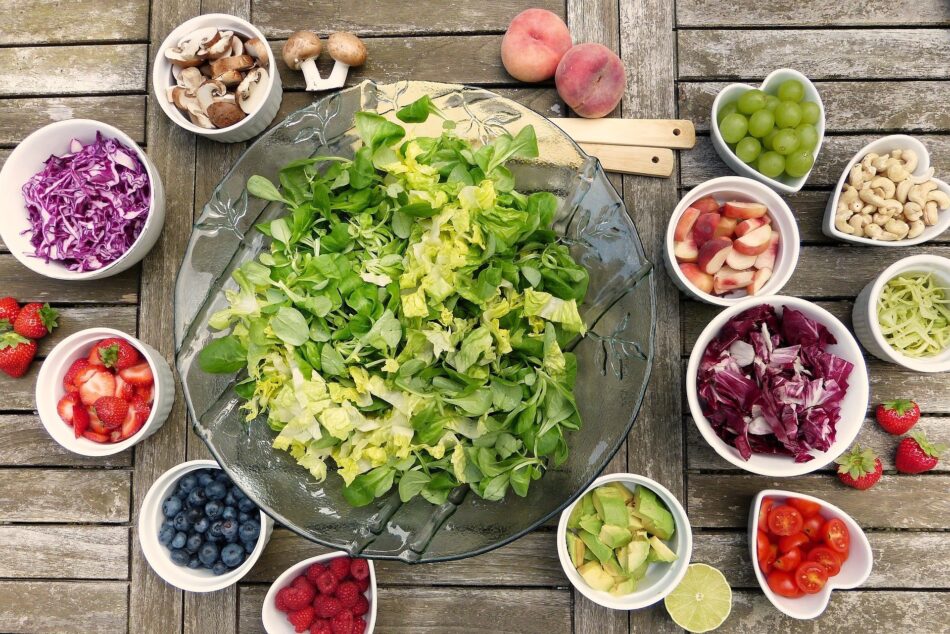
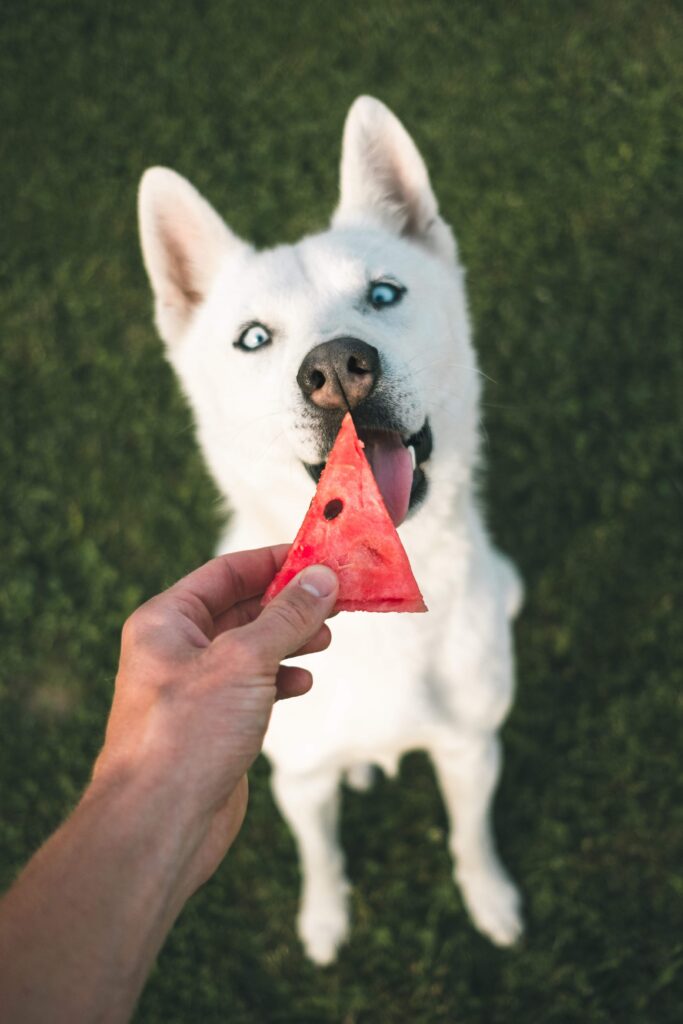
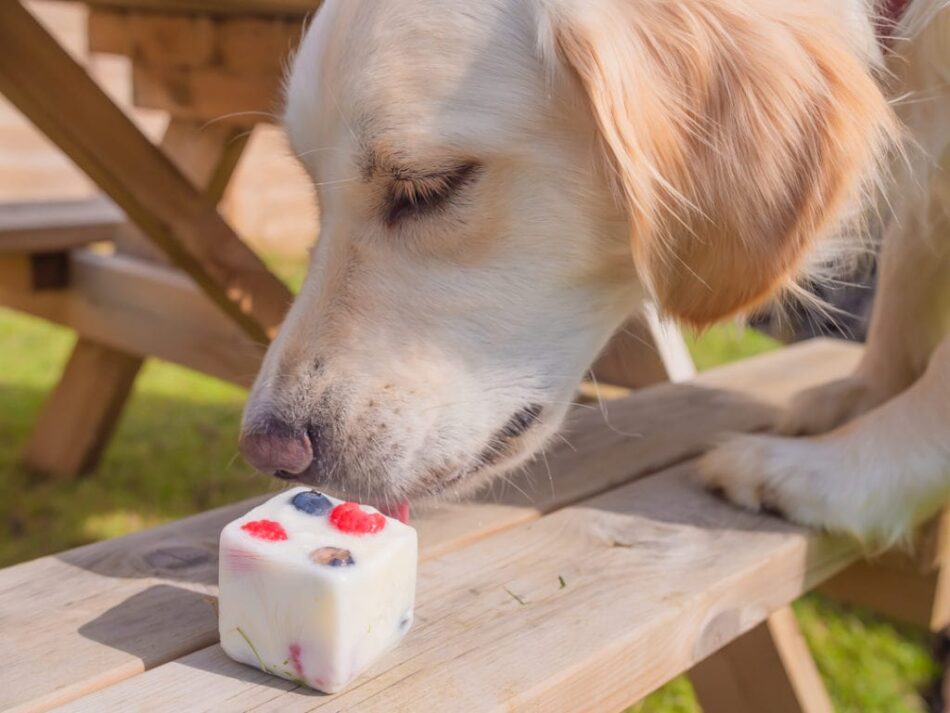
Try out these delicious homemade frozen treats that dogs will go crazy for! These are super quick and easy to make, and kids will love getting involved with different fruity creations…

You will need…
An ice cube tray – (moulds to make larger ice cubes are available on Amazon)
500g Greek Yogurt
200ml of water
A selection of dog-safe fruits, such as apples, bananas, blueberries, mango, peaches, raspberries, strawberries, and watermelon.
We used an ice cube tray which makes large 2 inch square ice cubes. This quantity made approximately 8 at this size ice cube.
Method
Prepare the fruit and cut up into smaller bite size pieces.
Depending on the size of ice cube tray, fill the molds up to a third high with yogurt, followed by a small splash of water. Pop a few small pieces of fruit into the moulds, before continuing to fill the molds with yogurt, splashes of water up and pieces of fruit up to the top.
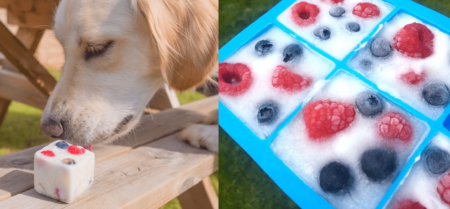
Pop in the freezer for at least 4 hours depending on the size of the ice cube moulds.
Allow the treats to thaw for 5-10 minutes before feeding to your dog.
Other Frozen Treats…
If your fruit bowl contents are on their way out and unlikely to be eaten by the humans in the house, you can also freeze cut up pieces of the fruit, like apples and bananas, to give to your four-legged friends directly.
Don’t forget!
Remember to give your dog treats in moderation, alongside a healthy diet. Supervise your dog when eating these frozen treats and remove at any sign of distress. These frozen fruit cubes should be given to your dog as a treat, with other solutions in place to keep your dog cool, such as access to shade in the garden and the coolest room in the house, fresh water, walks at the coolest time of day etc. Consult your vet if your dog is showing signs of distress or potential heatstroke.
This entry was posted in Dogs

For most pet dogs meal time isn’t very challenging time of the day. Typically owners only put the food bowl down and leave them to it. If this suits you and your dog that’s absolutely fine, but they would without a doubt not have been served food in this way in the wild. Instead they would have had to scavenge and hunt for their meals, keeping both mind and body active. If you feel like you would like to challenge your dog and enrich their daily routine, then making some changes to their meal times can be a good start.
Adding more mental stimulation to your dog’s life can have several benefits. It keeps them busy and tires them out in a similar way to a long walk. Many dog owners forget about challenging their dogs mentally, and when they encounter problems with boredom and linked behavioural issues like chewing, pacing, jumping and barking, they just presume they need to increase the physical exercise. This helps, but it doesn’t satisfy your dog’s hunger for mental stimulation.
Mentally stimulated dogs are not as hyperactive, and they tend to adapt more easily to stress. This is useful if you’ve got a very worried pup who shows aggression towards other dogs walking past the house, struggles with separation anxiety or gets stressed during thunderstorms or fireworks.
Brain games are therefore a brilliant way of tiring your dog out for the evening, or before you leave for work in the morning. By combining this with their normal feeding time, it won’t take much longer than normal, and your dog will love the extra challenge. Additionally you don’t have to worry about giving your dog too many treats as they are rewarded with food they would have eaten anyway.
So what are some fun ways of mentally stimulating your dog during meal times?
The aim is that it should take your dog 10-15 minutes to finish their food. Make sure you supervise your dog the first few times you’re trying a new way of feeding.
Our first tip is nose work. Using their nose comes naturally to dogs, and searching for their food will definitely add stimulation to their daily routine. Scatter the food in the garden so that your dog will have to sniff around to find it. You can also do this indoors, but it might be good to choose a room that’s easy to clean and where the pieces of food won’t get stuck under furniture. If you want to make it even more challenging you can hide little heaps of food under a bush, on a window sill or behind some flower pots. If your dog doesn’t get the game, start with something that smells a bit more than their normal dry food.
Our second suggestion is puzzles and food dispensing toys. The Classic Kong is the most well known food dispensing toy, but you can also find treat balls and complicated puzzles that provide your dog with a harder challenge before they are rewarded with food. The idea with most of these is that your dog will have to move the toy around the floor or press certain parts of the toy to make the food fall out. Dogs absolutely love this, and as they get rewarded again and again it can keep them entertained for hours.
If you don’t want to buy toys you can make some yourself. Try putting the food in a cereal box and taping it shut, in a toilet roll with folded sides, or in a plastic bottle with some holes cut out where the food can fall out. This can get a bit messy, and definitely noisy, but it’s worth it when you see your dog running around trying to get into the box, tail wagging with excitement.
You can also use mealtime as an opportunity to practice tricks and teach your dog new ones. Don’t ask your dog to do the same tricks every meal time, as it will just become a part of the routine, and not challenging or mentally stimulating. By using this time for training you are able to give your dog more than just the one treat at a time, as it’s the food he or she is supposed to eat anyway. This will form a stronger positive association, and your dog might learn faster.
Another thing you can do to change the daily routine is to change the texture of the food. If your dog normally gets wet food, try freezing it into little discs or cubes that they will love crunching on. If your dog gets dry food you can mush it up with a bit of yoghurt or water. It’s all about novelty and enriching your dog’s daily routine!
This entry was posted in Dogs
Christmas is the time for all the family to enjoy – our pet pooches included. We know that dogs are best off sticking to their normal food over the holidays but ignoring those puppy eyes beaming up to the dinner table is notoriously difficult. If you know you won’t be able to resist sneaking your furry friend some festive treats, it’s important to know what Christmas foods you can, and what Christmas foods you definitely can’t, give your dog.
Christmas foods that your dog shouldn’t eat
Starting with the basics, your dog should never be encouraged to join in with Christmas drinking. Even a small amount of alcohol can be dangerous. There are also several traditional festive food goodies that you should not share with your pet:
- The bones and skin from the turkey or chicken
Bones from any bird can be dangerous. They can get lodged in the throat, becoming a serious choking hazard, and can break into small sharp pieces that can pierce the lining of the stomach or intestines. Turkey skin is extremely fatty, which is not only unhealthy for dogs, but can cause serious problems with their pancreas. - Gravy
You may think that gravy is delicious and completely harmless, but it’s high in salt and fat, both of which can be dangerous to dogs. - Onions and other bulb vegetables
All types of alliums are poisonous to dogs, so it’s important to keep your pet away from them. Onions are the main cause for concern, but other bulb vegetables, like garlic, can also cause serious problems. - Grapes, raisins, currants and sultanas
All of these items are highly toxic to dogs. In fact, if your pet eats even a small amount, you should seek help from a vet as soon as possible. For this reason, Christmas treats such as Christmas pudding, Christmas cake and mince pies should never be fed to dogs, and ideally be kept out of reach at all times. - Chocolate in any form
Chocolate is a favorite in most homes over the holidays, but it’s very bad for dogs. It contains theobromine, which can be deadly to your furry friend even in small amounts, so don’t let them have any, no matter how much they give you the sad eyes treatment.
You should of course not serve any of these foods to your dog at any time of the year, but it might be a good idea to keep an extra eye on your dog during the holidays, as leftovers might be left on the table while you enjoy a game of charades, or well-meaning guests might try to sneak your pooch a bit of Christmas cake. It’s a good idea to tell everyone not to feed the dogs anything, and then, if you really want to, you can treat them to some canine-friendly festive food yourself. Here are a few things that are fine for dogs to eat.
Christmas foods that your dog can eat
Christmas won’t be ruined for your dog if they don’t get a special Christmas dinner, but if you want them to join in with the celebrations, you can try some of these things. It’s important to remember that all of these foods should be given to dogs in moderation – keep portions small.
- A few slices of turkey
You can give your pet some white turkey meat, as long as the skin and all bones have been removed. - Boiled and mashed potatoes
Dogs will enjoy a small amount of boiled or mashed potato. Remember that you should only ever feed your pet plain potato with no salt or butter added. - Other vegetables
As with any other food items, do not give your dog a pile of vegetables, but it’s fine to let them have a try of a few selected items from the Christmas meal. Sprouts, swedes, parsnips and green beans are normally very popular with dogs, as is a raw or cooked piece of carrot. Do not add any seasoning, butter or sauces before you give the vegetables to your pet, however. - Eggs
Many of us enjoy some scrambled eggs on Christmas morning, and this is another thing you can give to your dog as a treat. In fact, eggs contain lots of beneficial vitamins and minerals, and can make the dog’s coat shinier. Again, you should not add any butter or salt to the eggs, and it’s best to keep portions small. - Fruit with pips or stones removed
Most fruits in the fruit bowl can be shared with your dog, as long as pips or stones are removed, and items like bananas and satsumas are peeled. You should however remember that fruit is acidic and contains a lot of sugar, so can cause stomach problems in dogs if they have too much.
Omlet and your dog’s Christmas
Whichever foods you’ll be tucking into over the holidays, Omlet has just what your pup needs to have to make sure it’s their best yet. Our easy-to-clean dog beds are perfect for messy pups this season, and our ingeniously designed dog crates are ideal for when Fido needs a break. So, now you know what foods are on and off the menu, it’s time to enjoy the festivities, knowing your canine companion will be staying safe.
This entry was posted in Dogs